Using FileAssurity
Unprotecting/Verifying Files
Unprotecting Files
1. Highlight the protected/signed file in the FileAssurity window.
2. Click on the
 button.
Your file is then unprotected/verified. It is restored to its original filename and saved to the folder selected in the 'Default Settings' dialog.
Alternatively, double-clicking on a secured file in the right-hand pane or right-clicking on a secured file in the right-hand pane and selecting 'Unprotect selected files' will automatically unprotect/verify it.
How do I unprotect a number of files simultaneously
NOTE: It does not matter which signing key or protection key is displayed in the 'Sign As' or 'Protect For' drop-down list boxes as these fields are ignored. Unprotection and verification is transparent - FileAssurity automatically works out if you have the key(s) required to unprotect and verify the files. If you do not posess the correct access key(s) in your keystore then FileAssurity will notify you because unprotection of files cannot take place.
Unprotecting Archives
By default all the files in an archive are unprotected/ verified when the æUnprotect & VerifyÆ button is pressed. If you just want to unprotect/verify selected files then you must select them first in the right-hand pane before pressing the æUnprotect & VerifyÆ button.
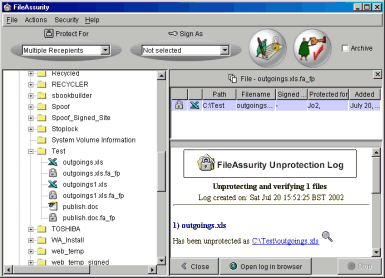
Log File Window
FileAssurity displays a log of the files you have unprotected/verified in the bottom half of the right-hand pane as shown below: